
Connect Your Guide to Mailchimp
In short
Roccai adds and updates Mailchimp audience subscribers the moment someone submits an input card. Get two things from Mailchimp, an API key and the audience ID, paste them into Share → Integrations → Mailchimp, map one field to EMAIL, and choose which campaigns feed the audience.
Updated
The Mailchimp integration adds and updates audience subscribers in real time, the moment someone submits an input card in your guide. Because the answers arrive in merge fields and the subscriber is tagged with the campaign they came from, you can segment a newsletter on what people actually told you they wanted, not on opens and clicks.
Before you start
- A Mailchimp account where you can create API keys (owner or admin).
- The Mailchimp audience you want subscribers added to.
- A guide with an input card that asks for an email address — the email is what identifies the subscriber. If a submission has no email, nothing is sent to MailChimp.
- The merge fields you plan to write to, already created in Mailchimp under Audience → Settings → Audience fields and *|MERGE|* tags.
EMAIL,FNAMEandLNAMEexist in every audience by default.
Step 1 — Create a Mailchimp API key
In Mailchimp:
- Click your profile icon and choose Profile.
- Click the Extras drop-down and choose API keys.
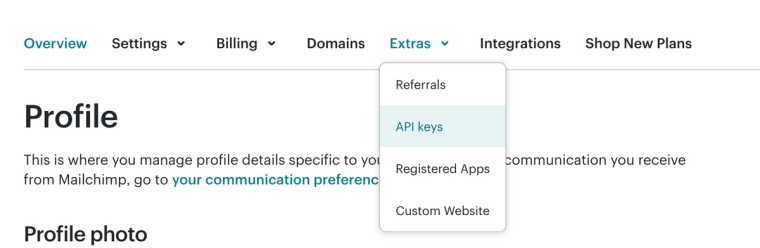
- In the Your API Keys s
- ection, click Create A Key.
- Name the key something you will recognise later — for example
Roccai Guide. You will only ever see this name and the first four digits of the key in the list. - Click Generate Key.
- Click Copy Key to Clipboard and save it somewhere secure. This is the only time the full key is shown — if you lose it you have to generate a new one and update the integration.
- Click Done.
MailChimp keys expire one year after you create them. Put a reminder in your calendar now, other
wise subscribers will quietly stop arriving in twelve months.
Step 2 — Find your audience ID
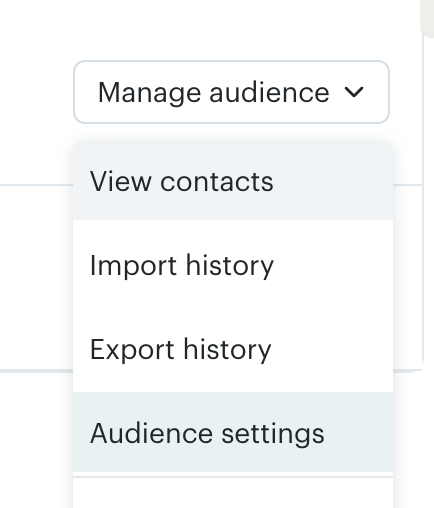
Still in Mailchimp, go to Audience → Manage audience → Audience settings, pick the audience you want to feed, and copy the Audience ID shown there (MailChimp sometimes calls it the List ID). It is a short string of lowercase letters and numbers, such as 1a2b3c4d5e — not the audience name.
Step 3 — Paste both into Roccai
In Roccai, open
the guide, go to Share → Integrations and open Mailchimp. Switch the toggle to Enabled and fill in:
- API Key — the whole key you copied, including the datacenter suffix at the end (
…-us10). Roccai reads the suffix to know which Mailchimp server to talk to, so a key pasted without it is rejected. - Audience ID — from step 2.
- Tag (optional) — a label every subscriber from this guide gets, such as
Newsletter signuporinstagram. Leave it empty and subscribers are tagged with the campaign name instead. - Campaigns — which campaigns feed this audience. Leave it empty to send from all campaigns.
Step 4 — Map your fields
The mapping table pairs each Roccai Source — the fields on your input card, plus any consent items — with the MailChimp Merge Field it should populate:
| Roccai source | Mailchimp merge field | Notes |
|---|---|---|
| Email field on your input card | Required — without it the integration cannot be saved | |
| First name | FNAME | Exists in every audience by default |
| Last name | LNAME | Exists in every audience by default |
| Phone | PHONE | Create the field in Mailchimp first if your audience doesn't have it |
| Consent checkbox | e.g. CONSENT | Arrives as the text true or false |
Three rules the form enforces:
- One row must map to
EMAIL— the email is how Mailchimp identifies the subscriber. - A merge fi
- eld must be an uppercase merge tag of at most 10 characters (
EMAIL,FNAME,BIRTHDAY), and it must already exist in the audience. - Each merge field can only be used once.
Click ADD A TARGET for each extra field, then Save.
How subscribers arrive
On submission, Roccai looks the person up by email address. An existing subscriber is updated — the mapped merge fields are overwritten, never duplicated — and someone new is added as subscribed. Either way the subscriber is tagged with your Tag, or with the campaign name if you left the Tag empty.
Because new contacts are added straight to the audience as subscribed, keep a consent checkbox o
n the input card and only map the fields you have permission to store.
Check that it works
- Open your guide through its share link and complete it, submitting the input card with your own email.
- In MailChimp, open the audience and search for that email address.
- Confirm the tag is there and the merge fields hold your answers.
Troubleshooting
| What you see | Why | Fix |
|---|---|---|
| The API key is marked invalid | The datacenter suffix is missing or the key was truncated on copy | Paste the whole key, including the trailing -us10 (the number differs per account) |
| The audience ID is marked invalid | The audience name or a URL was pasted instead of the ID | Use the ID from Audience → Manage audience → Audience settings — lowercase letters and numbers only |
| Save stays greyed out | No row maps to EMAIL, a merge field is lowercase or longer than 10 characters, or one is used twice | Fix the rows flagged in red; every row needs both a source and a valid, unique merge field |
| Nobody arrives in the audience | The integration is disabled, the campaign isn't in the Campaigns list, or the guide was completed without submitting the input card | Check the toggle, and empty the Campaigns list to accept every campaign |
| Subscribers arrive but merge fields are empty | The merge tag doesn't exist in that audience, so Mailchimp drops the value | Create it under Audience → Settings → Audience fields and *|MERGE|* tags, spelled exactly as in the mapping |
| It worked, then stopped about a year later | Mailchimp API keys expire one year after they are created | Generate a new key and paste it into the integration |
What gets sent
Only the fields you mapped, plus the tag. Answers that aren't in the mapping table, and everything else the guide collected, stay in Roccai.
Create a Mailchimp API key
In Mailchimp, click your profile icon → Profile, open the Extras drop-down and choose API keys. In Your API Keys, click Create A Key.
Name the key and copy it
Name it something recognisable, such as "Roccai Guide", click Generate Key, then Copy Key to Clipboard and store it securely — the full key is shown only once. Click Done.
Find your audience ID
Go to Audience → Manage audience → Audience settings for the audience you want to feed, and copy the Audience ID (a short lowercase string such as 1a2b3c4d5e).
Open the Mailchimp integration in Roccai
Open your guide, go to Guide Settings → Integrations, open Mailchimp and switch the toggle to Enabled.
Paste the API key and audience ID
Paste the whole API key including its datacenter suffix (for example -us10) and the audience ID into their fields.
Set a tag and choose campaigns
Optionally set a Tag for every subscriber from this guide; leave it empty to tag by campaign name. Under Campaigns, pick which campaigns feed the audience, or leave it empty for all of them.
Map your fields to merge fields
In the mapping table, pair each Roccai source with a Mailchimp merge field. One row must map to EMAIL; merge fields must be uppercase, at most 10 characters, unique, and already exist in the audience. Click Save.
Test with your own email
Complete the guide through its share link, submit the input card, then find your email in the Mailchimp audience and check the tag and merge fields.