
Build a Live Product Feed in Google Sheets
In short
Put one product per row in a Google Sheet and publish that tab to the web as CSV. Paste the published link into Product Setup → Via Link, switch on Auto-Update Product Feed under Advanced Settings, then run Detect Data. Roccai re-reads the sheet every night, so edits in the sheet update your guide.
Updated
A Google Sheet is the quickest way to get products, services or experiences into a guide when you have no webshop feed to point at. It behaves like any other feed URL: Roccai reads it, maps the columns to product-card fields, and with auto-update on, fetches it again each night. Change a price in the sheet today, and the guide shows the new price tomorrow morning.
A sheet is the right source when:
- Your products don't live in a webshop; courses, services, rooms, experiences, articles.
- You want a hand-picked selection rather than everything in your store.
- You want colleagues who don't have Roccai access to keep the products current.
If you do have a Shopify or WooCommerce store, use the real feed instead, it stays in sync with stock and prices on its own.
Before you start
- A Google account that is allowed to publish a sheet to the web. Some Workspace domains block this — ask your IT admin if the option is greyed out.
- A public image URL for each product. Images stored in Google Drive or on an intranet won't load in the guide.
- Nothing confidential in the sheet. Publish to the web makes that tab readable by anyone with the link; cost prices, supplier names and internal notes don't belong in it. Keep those in a separate sheet.
Step 1 — Build the sheet
Put the column names in row 1 and one product per row below. Nothing above the column names — no sheet title, no merged cells, no logo. Roccai reads the very first line as the column names, so a title row makes your headings the product data.
Name the columns exactly like this and Roccai will recognise them by itself:
Columns for a Google Sheet product feed
| Column | What goes in it | Needed? |
|---|---|---|
| id | A unique code per product — 1, 2, 3 or your own SKU. Never reuse one. | Required |
| link | The full https:// address of the page the product opens. | Required |
| title | The product name shown on the card. | Strongly recommended |
| imageUrl | A direct link to the image file, ending in .jpg, .png or .webp. | Strongly recommended |
| description | The text on the card. Keep it short — two or three lines. | Recommended |
| tags | What the product is, comma-separated: håndværk, krea. This is what the AI matches answers against. | Recommended |
| price | Plain numbers — 249 or 249.00. Set the currency later, in the mapping step. | Optional |
| sale_price | The discounted price, if any. Spell it with the underscore. | Optional |
| status | in stock / out of stock, so sold-out products can be hidden. | Optional |
| subtitle | A short line under the title. | Optional |
Three things that trip people up:
- Tags are split on commas — and also on
+,>,/,;and|. Sogift, jul, under 300becomes three tags, and a tag containing one of those characters will be broken in two. - The image URL must be the image itself, not the page it sits on. Right-click an image on your website and choose "Copy image address".
- Keep the header row stable. Add and remove rows as much as you like, but renaming or reordering columns means re-mapping the feed in Roccai.
One trick worth knowing: give several columns the same name and Roccai merges them into a list. Three columns all called imageUrl give the product three images.
Step 2 — Publish the sheet to the web as CSV
This is the step people skip. A normal share link gives Roccai a web page, not data, it has to be a published CSV link.
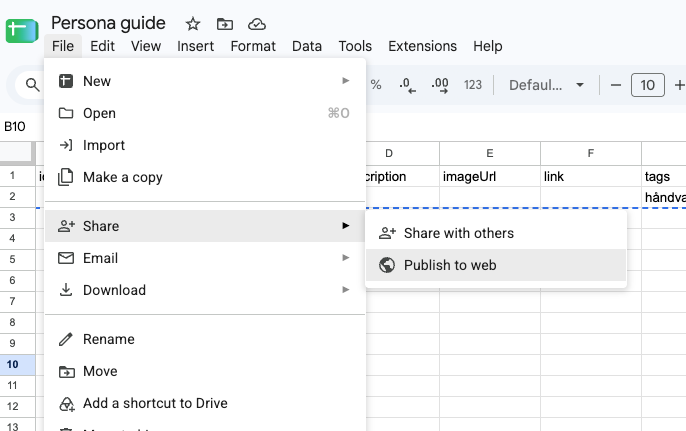
- In your sheet, open File → Share → Publish to web.
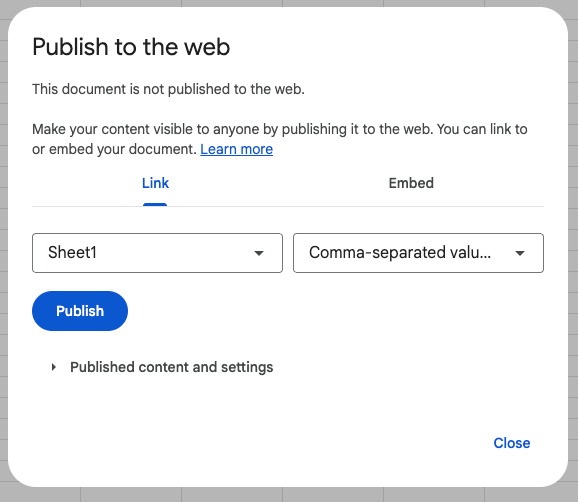
- In the Link tab, pick the tab with your products in the left drop-down (not "Entire document").
- In the right drop-down, choose Comma-separated values (.csv).
- Click Publish and confirm.
- Copy the link it gives you. It looks like
https://docs.google.com/spreadsheets/d/e/2PACX-…/pub?gid=0&single=true&output=csv— it must end inoutput=csv.
Leave the sheet published. If you ever click Stop publishing, the link dies and the nightly sync stops finding your products.
Step 3 — Add the link in Roccai
- Open your guide and go to Product Setup.
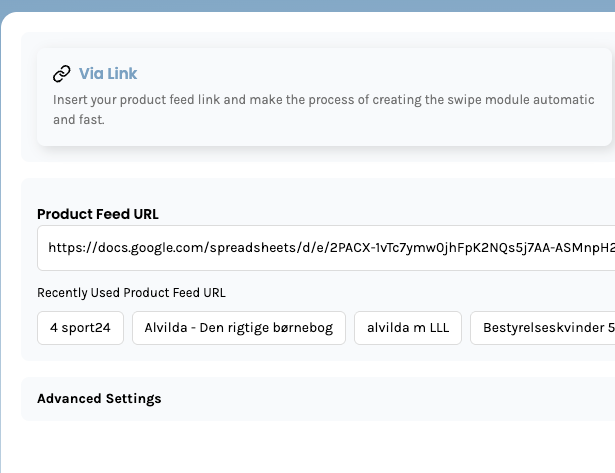
- On the Source step, choose Via Link — not Via CSV Or JSON File, which is for a one-off upload that never updates.
- Paste the published link into Product Feed URL.
Step 4 — Turn on Auto-Update Product Feed
Open Advanced Settings under the URL field and switch on Auto-Update Product Feed. Roccai then fetches the sheet again every night, around 02:00, and updates the products in your guide.
Only link feeds can do this — it is the reason to choose Via Link over a file upload. The setting is saved when you confirm the feed at the end of the flow.
Step 5 — Detect Data and map the fields
- Click Detect Data. Roccai reads the sheet and works out what each column is.
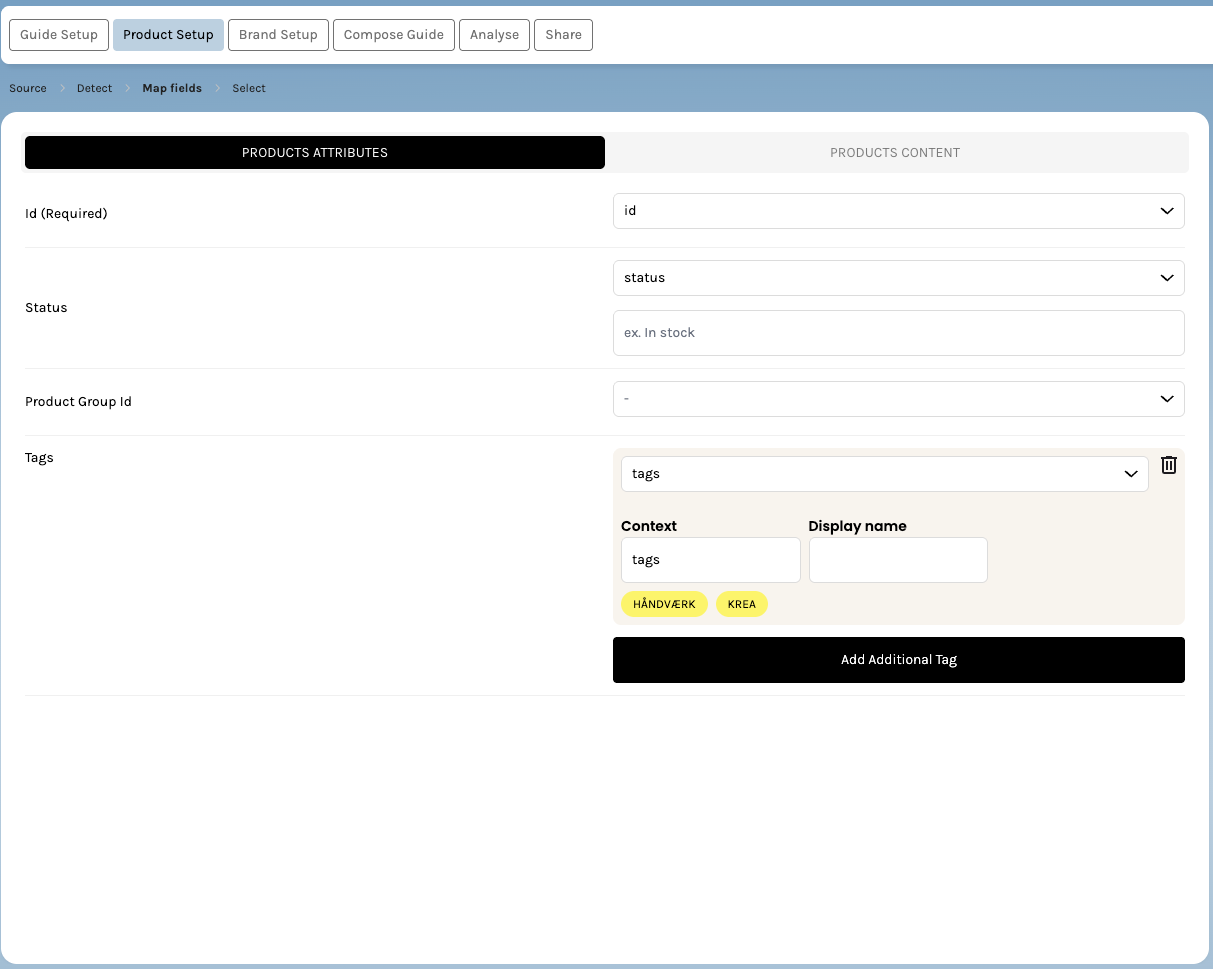
- On Map fields, check the two tabs. Products attributes holds Id (Required), Status, Product Group Id and Tags. Products content holds Title, Subtitle, Text, Image URL, Link (Required), Price and Sale Price.
- Anything Roccai didn't match itself, pick from the drop-down. Anything you don't want on the card, set to “-”.
- For Status, choose the column and type the value that means in stock — for example
in stock— into the box next to it. - For Tags, the yellow chips under the drop-down are a live preview of the tags from your sheet. Use Add Additional Tag if you keep tags in more than one column, and Display name to relabel a tag group for shoppers.
- Continue to Select, choose whether to import everything or only certain tags, and confirm.
When your edits show up
| What you change in the sheet | When the guide shows it |
|---|---|
| A price, title, description or image URL | At the next nightly sync |
| A new row (new product) | At the next nightly sync |
| A deleted row | At the next nightly sync |
| A new or renamed column | Not until you run Detect Data again and map it |
| Anything, and you can't wait | Run Detect Data again on the same URL |
Google also caches a published sheet for a few minutes, so a change you make right before a sync can land the following night instead. It is a feed, not a live spreadsheet view.
Troubleshooting
| What you see | Why | Fix |
|---|---|---|
| “We could not detect your data” | The link is the /edit or share link, or the publish was set to Web page instead of CSV | Re-publish the tab as Comma-separated values (.csv) and use the link ending in output=csv |
| The columns are named after your sheet title, and one product is nonsense | There is a title or a merged cell above the column names, so Roccai read that line as the headings | Delete everything above the column names — they must be the first line of the tab |
| Products have no image | The imageUrl points at a page or a Google Drive file instead of the image file | Use a direct public image URL ending in .jpg, .png or .webp |
| Tags are wrong or split oddly | The tag cell contains , + > / ; or |, which all split a tag | Separate tags with commas only, and avoid those characters inside a tag name |
| Columns didn't map themselves | The column names differ from the ones Roccai knows | Pick them by hand on Map fields, or rename the columns to id, title, description, imageUrl, link, price, sale_price, status, tags |
| The sheet changed but the guide didn't | Auto-Update Product Feed is off, or the nightly sync hasn't run yet | Check the toggle under Advanced Settings, or run Detect Data again to update now |
| Everything disappeared overnight | The sheet was unpublished, moved to another account, or the tab was renamed | Re-publish the tab and paste the new link into Product Feed URL |
Danish and other special characters
Æ, ø, å and accented letters come through as long as the sheet is published from Google Sheets itself — it always publishes UTF-8. If you paste a CSV from Excel into a sheet first, check that the letters still look right before you publish.
Build the sheet
Put the column names in row 1 — id, title, description, imageUrl, link, tags, price, status — and one product per row below. No heading and no blank rows above the column names.
Open File → Share → Publish to web
In your Google Sheet, open the File menu, choose Share, and then Publish to web.
Publish the product tab as CSV
In the Link tab, pick the tab holding your products and choose Comma-separated values (.csv) in the second drop-down. Click Publish and confirm.
Copy the published link
Copy the link Google shows. It ends in output=csv — a normal share link or the /edit URL will not work.
Choose Via Link in Product Setup
In Roccai, open your guide, go to Product Setup and choose Via Link on the Source step. Via CSV Or JSON File is a one-off upload that never updates.
Paste the link and turn on Auto-Update Product Feed
Paste the published link into Product Feed URL, then open Advanced Settings and switch on Auto-Update Product Feed so Roccai re-reads the sheet every night.
Detect Data and map the fields
Click Detect Data. On Map fields, check Products attributes (Id, Status, Product Group Id, Tags) and Products content (Title, Text, Image URL, Link, Price), picking any column Roccai didn't match by itself.
Select the products and confirm
Continue to Select, choose whether to import all products or only certain tags, and confirm. Your guide now runs on the sheet.