As we illustrated in our Product Feed Generation Guide for WooCommerce, the easiest way to generate a product feed is, of course, with a plugin, and Shopify is no different! In this step-by-step guide, you will learn how to get product feeds from Shopify using the FeedFusion plugin.
1. Introduction: How to Get Product Feeds from Shopify
What are Product Feeds?
Product feeds are files that contain detailed information about your products, such as titles, descriptions, prices, and images. You can use these feeds to upload product information to the Roccai platform to generate your User Journey. The feed should be an URL and in XML or JSON format.
Why Use FeedFusion?
This guide will focus on the FeedFusion plugin for Shopify, a powerful tool that simplifies the process of generating product feeds. It offers advanced filtering options, making it easy to create tailored feeds that meet specific needs and ensuring that your product information is accurate and up-to-date across all platforms.
2. Setting Up FeedFusion on Shopify
Installing the FeedFusion Plugin
Go to the Shopify App Store: Open your Shopify admin panel and navigate to the App Store.
Search for FeedFusion: Type “FeedFusion” into the search bar.
Install the Plugin: Click on the FeedFusion app and click the “Add app” button. Follow the on-screen instructions to install the plugin.
Authorize the App: Once installed, authorize FeedFusion to access your Shopify store data.
Initial Configuration
Open FeedFusion:Open the FeedFusion app from your Shopify admin panel after installation.
Set Up Your Account: Follow the prompts to set up an account. This will include entering your business details and preferences.
Configure Basic Settings: Adjust the basic settings such as default currency, language, and target markets.
3. How to Get Product Feeds with FeedFusion
Accessing FeedFusion
Navigate to FeedFusion: In your Shopify admin panel, go to Apps and click on FeedFusion.
Dashboard Overview: Familiarize yourself with the FeedFusion dashboard. This is where you’ll manage all your product feeds.
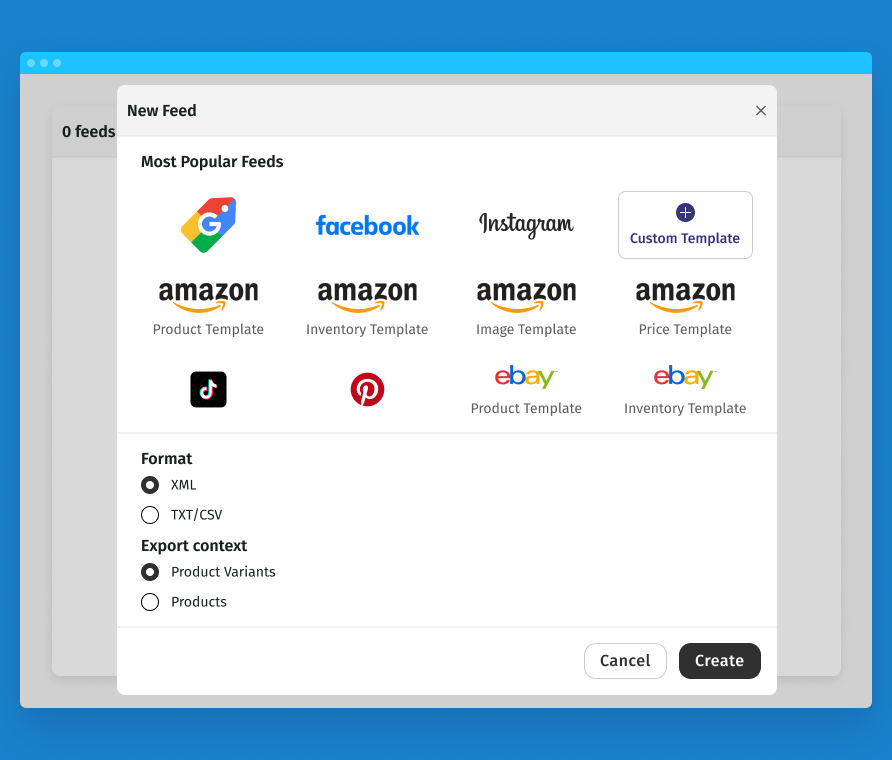
Creating a New Feed
Start a New Feed: Click on “Create New Feed.”
Choose a Template: Select a template that matches your needs, or start from scratch.
Select Products: Choose which products you want to include in your feed. You can select all products or specific collections.
4. Using Filtering Options in FeedFusion
Setting Up Filters
Access Filters: Within your new feed, navigate to the Filters section.
Add Filters: Click “Add Filter” and choose from the available options, such as price range, product type, or stock status.
Customize Filters: Adjust the filter settings to match your specific needs. For example, you can set a filter to include only products above a specific price.
For Roccai, we need the following
id (required)
title (required)
subtitle
description (required)
imageUrl (required)
link (required)
tags
categories
price
sales price
status (in stock etc.)
5. Exporting and Using Your Product Feed
Exporting the Feed
Choose Export Format: Choose XML to ensure a seamless upload to the Roccai platform.
Export the Feed: Click “Export” and save the file to your computer.
Integrating with Swipe Journeys
Upload the Feed:
You can read more about this process in our guide: Getting Started.
6. Troubleshooting and FAQs
Common Issues
Feed Not Updating: Ensure that the FeedFusion plugin has the necessary permissions to access your Shopify store data.
Incorrect Product Data: Double-check the filters and settings in FeedFusion to ensure they are configured correctly.
Additional Resources to get Product Feeds from Shopify
Did you know that segmented email campaigns can drive a 760% increase in revenue? That’s because segmentation allows marketers to deliver hyper-targeted content that resonates with specific audience groups. But what exactly is newsletter segmentation, and how can it transform your email marketing strategy?
What is Newsletter Segmentation?
Newsletter segmentation is the process of dividing your email subscribers into specific groups to provide them with tailored and relevant content. By segmenting your audience, businesses can move away from sending the same generic email to everyone and instead send personalized newsletters based on subscriber behavior, preferences, or data collected during signup. This approach increases engagement and boosts open rates, click-through rates, and conversions, leading to more successful email marketing campaigns.
Benefits of Newsletter Segmentation
Segmenting your newsletters offers a range of benefits, including:
Increased Sales: Personalized content encourages recipients to take action, whether it’s making a purchase or signing up for an event.
Higher Engagement: Sending content relevant to each segment increases the likelihood of your audience opening and interacting with your emails.
Lower Unsubscribe Rates: Delivering targeted messages reduces the likelihood of subscribers opting out.
How Roccai Enhances Newsletter Segmentation
At Roccai, we’ve created an innovative swipe tool that takes your newsletter strategy to the next level. Here’s how it works:
At Roccai, we’ve developed an interactive solution that allows your subscribers to swipe through images and questions, making it easy to capture precise preferences directly from each user.
Fully Customizable to Your Brand The visuals and questions can be completely customized to match your brand’s look and feel, ensuring a seamless experience that resonates with your target audience. Implementing the swipe journey is straightforward—simply add it as a link or button in your newsletters, no coding required. Your team can integrate this feature effortlessly into existing campaigns.
Interactive Segmentation for Better Engagement Several of our clients are already leveraging this solution to enhance their newsletter segmentation. By enabling subscribers to indicate their preferences through a simple YES or NO swipe on various topics, users are automatically grouped into the right email lists based on their interests. This means each segment receives content tailored to their unique preferences.
Boosting Completion Rates Traditional questionnaires often struggle with drop-offs, but our swipe tool is designed to maintain engagement from start to finish. In fact, we’ve observed over 66% of users completing the swipe journey, even with up to 22 questions—significantly outperforming standard surveys.
Leveraging Zero-Party Data for Personalization The insights gathered through Roccai’s platform are what’s known as zero-party data—information that your users willingly share with you. This gives you a direct understanding of what your audience wants, enabling you to create hyper-targeted, relevant content that strengthens customer relationships and drives higher engagement.
Exporting Data for Improved Segmentation
Access to the correct data is essential to continuously improving your segmentation efforts. This is where integrating Roccai’s tools with platforms like Zapier comes in handy. Using our Zapier integration guide, you can easily export data and automate workflows that enhance your segmentation strategy. This allows for more efficient data management and helps refine your newsletter targeting.
Key Takeaways of Newsletter Segmentation
Segmentation is Crucial for Effective Email Marketing Personalized newsletters drive higher engagement, reduce unsubscribe rates, and lead to increased sales by delivering content that speaks directly to each subscriber’s preferences.
Roccai’s Swipe Tool Creates Engaging Experiences Our swipe tool enhances your segmentation strategy by allowing subscribers to interact with your brand through visually engaging swipes. This keeps users engaged throughout the journey and captures zero-party data seamlessly—without interrupting the user experience.
Zero-Party Data for Smarter Targeting With data that users actively choose to share, you gain deeper insights into their true interests, making your email campaigns more relevant and impactful.
Streamlined Integration and Automation Tools like our Zapier integration simplify exporting data and automating segmentation processes, ensuring that you’re always optimizing your targeting and campaign performance.
Ready to elevate your newsletter strategy? Contact us today to learn how Roccai’s swipe tool can help you create highly personalized, high-converting email campaigns that keep your audience coming back for more!
Follow these easy steps to generate product feeds using the CTX Feed plugin. This method ensures that your product data is accurate, up-to-date, and ready to be uploaded to our platform to create your Swipe Journey.
Introduction to Product Feeds
Product feeds are files that contain a list of your products and their attributes, such as price, description, image URLs, and availability. These feeds are crucial for listing your products on various platforms like Google Shopping, Facebook Ads, and on our platform too.
Why Use CTX Feed Plugin
The CTX Feed plugin is highly recommended for its user-friendly interface and powerful features. It supports over 100 marketing channels and allows you to create feeds in multiple formats, including XML, CSV, and JSON. This flexibility ensures that your product data meets the specific requirements of different platforms, saving you time and effort.
Step-by-Step Guide to Installing and Using CTX Feed
For simplicity, this guide is divided into two parts. The first part helps you install and activate the CTX Feed plugin. Let’s get started!
Part 1: Installing CTX Feed
1. Log in to Your WooCommerce Dashboard: Go to your WooCommerce admin panel.
2. Navigate to Plugins -> Add New: Search for “CTX Feed” in the search bar.
3. Install and Activate: Click on the “Install Now” button for the CTX Feed plugin and then activate it.
Part 2: Creating Your First Product Feed
Now, let’s move on to the second part: creating and retrieving the product feed.
1. Access CTX Feed: After activation, find the CTX Feed option in your dashboard menu.
2. Create a New Feed: Click “Make Feed” to create a new product feed.
3. Select a Template: Choose a template based on the platform you want to integrate with.
4. Configure Feed Settings:
File Format: Select your preferred file type.
Mapping Attributes: Map your WooCommerce product attributes to the required fields of the selected platform.
5. Generate the Feed: Click on the “Generate” button to create your product feed.
6. Download and Manage: Once generated, you can download the feed or copy the URL to integrate with the Roccai platform. If you choose to download the file, the format must be either XML or JSON.
All done! In order to find and manage the feed you have just created, go to the “Manage Feeds” option from the CTX Feed menu. In there, you will find the newly generated product feed for the WooCommerce store.
Customization Options
This section will guide you through various customization options available in the CTX Feed plugin, including setting up auto-updates, creating custom attributes, and utilizing advanced filtering options.
1. Setting Up Auto-Updates
Keeping your product feeds up-to-date is crucial for maintaining accurate product listings on various marketing platforms. The CTX Feed plugin allows you to automate this process, saving you time and ensuring your feeds are always current.
Navigate to Manage Feeds: Go to the “Manage Feeds” section in the CTX Feed plugin.
Set Update Intervals: Choose how frequently you want the feed to update (e.g., every hour, daily, etc.). This ensures your product data remains current without manual intervention.
2. Creating Custom Attributes
Custom attributes allow you to add additional information to your product feeds that may not be included by default. This can be particularly useful for meeting the specific requirements of certain marketing channels.
Define Custom Attributes: Navigate to the custom attributes section in the CTX Feed plugin.
Add New Attribute: Enter the name and value of the custom attribute you want to add. For example, you might want to add a “Sale Price” attribute for products on discount.
Map Attributes: Ensure that the custom attributes are correctly mapped to the corresponding fields required by the marketing channel.
3. Utilizing Advanced Filters
Advanced filtering options in the CTX Feed plugin allow you to include or exclude specific products from your feeds based on various criteria. This helps in creating more targeted and relevant product feeds.
Access Filter Options: When creating or editing a feed, look for the filter settings section.
Apply Filters:
By Category: Include or exclude products from specific categories.
By Price Range: Set a minimum and maximum price range for products to be included in the feed.
By Stock Status: Include only products in stock or exclude those out of stock.
By Product Attributes: Filter products based on specific attributes such as color, size, or brand.
Save Filter Settings: After configuring the desired filters, save the settings to apply them to your feed.
Manual Product Feed Creation (Brief Overview)
While using a plugin like CTX Feed is the easiest and fastest method, it’s worth noting that you can also create product feeds manually. This involves exporting your product data into a CSV file and formatting it according to the specifications of the platform you’re targeting. This method is more time-consuming and prone to errors, so a dedicated plugin is recommended.
FAQs
Can multilingual feeds be created? Yes, CTX Feed Pro supports multiple languages and currencies, making it ideal for international operations.
How do I ensure my product feed is up-to-date? The CTX Feed plugin offers an auto-update feature that allows you to set regular intervals for updating your product feeds. This ensures your feed data is always current.
What file formats does CTX Feed support? CTX Feed supports various file formats, including XML, CSV, TXT, TSV, JSON, and XLS. This flexibility allows you to choose the format that best suits your needs and the requirements of the marketing channels you’re using.
Following this guide, you can efficiently create and manage product feeds using the CTX Feed plugin, ensuring your products are accurately represented.
If you need further assistance, don’t hesitate to contact our support team or consult the additional resources provided.


Recent Comments